Role-Based Access Control in Supplier Portals
Role-Based Access Control (RBAC) assigns system access based on user roles, simplifying permission management in supplier portals. It helps protect sensitive supply chain data, minimizes security risks, and improves efficiency by ensuring users only access what they need. This guide outlines how to plan, implement, and maintain RBAC effectively, including role design, compliance alignment, and ongoing reviews.
RBAC in Supplier Portals ensures secure access by assigning permissions to roles like "Supplier Admin" or "Accounts Payable Clerk." It prevents data breaches, supports compliance, and streamlines operations. Key steps include mapping workflows, defining roles, assigning permissions, and conducting regular audits to maintain security and efficiency. Tools like AI can complement RBAC by automating tasks and monitoring anomalies.
How to Implement RBAC in Supplier Portals: A Step-by-Step Guide
Role-Based Access Control (RBAC) Explained: How It Works and Why It Matters for Security
sbb-itb-b077dd9
Planning Your RBAC Requirements
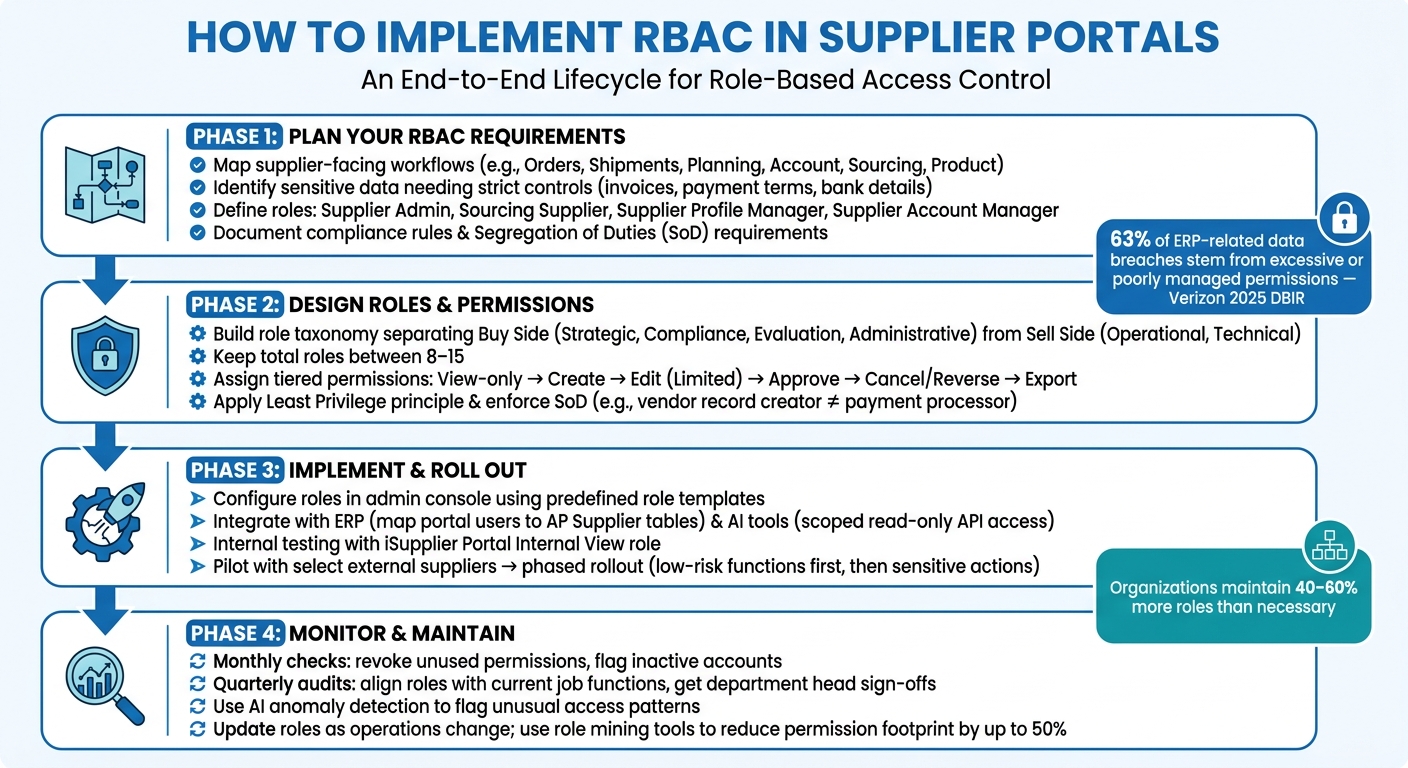
Laying out a clear plan is essential for setting up effective Role-Based Access Control (RBAC) in supplier portals. Without proper planning, you risk granting users either too much access to sensitive information or too little access, which could disrupt their work. Both scenarios can lead to costly mistakes.
Mapping Supplier-Facing Processes and Data
Start by listing all the workflows in your supplier portal. Focus on key categories like Orders, Shipments, Planning, Account, Sourcing, and Product. For each category, break down the specific tasks involved. For example:
- Under Orders, include tasks like purchase orders, agreements, change requests, and delivery schedules.
- Under Account, account for invoices, payments, remittance advices, and payment terms.
Here’s a table summarizing these categories and their key functions:
| Workflow Category | Key Functions to Review |
|---|---|
| Orders | Purchase Orders, Agreements, Work Orders, Change Requests |
| Shipments | Shipment Notices (ASN), Receipts, Returns, Delivery Performance |
| Planning | Forecasts, VMI, Inbound Consigned Inventory |
| Account | Invoices, Payments, Remittance Advices, Statements |
| Sourcing | RFQs, Quotation Submission, Negotiation History |
| Product | Supplier Items, Order Modifiers, Capacity, Quality |
Once you’ve outlined the workflows, identify which data needs stricter access controls. For instance, invoice details, payment terms, and bank account information should have more restrictions compared to shipment tracking data. With this groundwork, you can move on to defining roles and permissions.
Defining Roles and Permissions
Using the workflow map, assign roles based on the actions required. Common roles in supplier portals include:
- Supplier Admin: Manages overall supplier access and settings.
- Sourcing Supplier: Handles RFQs and submits quotes.
- Supplier Profile Manager: Updates company information, tax IDs, and bank accounts.
- Supplier Account Manager: Oversees invoices and outstanding balances.
On the buyer’s side, roles like Buyer Administrator manage tasks such as approving supplier registrations and handling profiles for specific business units.
To streamline onboarding, use template operators. These templates establish a standard set of permissions for each role, ensuring consistency. For example, every new Supplier Account Manager starts with the same access level - nothing more, nothing less. This approach also helps avoid "configuration drift", where permissions unintentionally change over time. After setting up roles, incorporate compliance and business rules into your RBAC structure.
Accounting for Business and Compliance Rules
Compliance requirements should guide your role design from the very beginning. One critical principle is Segregation of Duties (SoD), which ensures that no single individual has the authority to both initiate and approve sensitive actions. For example, the person approving a supplier registration shouldn’t be the same person managing that supplier’s financial transactions.
"Through the use of Supplier Management Groups, you can divide the responsibility for maintaining supplier information among several buyer administrators." - Oracle
Before building roles, document all relevant compliance and business rules. Specify which roles require approval workflows for sensitive changes and assign the appropriate internal roles - such as Finance Manager or Compliance Manager - for final sign-off. This documentation will be invaluable during periodic audits to ensure access remains aligned with your policies.
Designing Roles and Permissions for Your Supplier Portal
Once you've mapped workflows and defined roles, the next step is to create a detailed role structure that ensures secure access across your supplier portal. This structure should prevent unauthorized access and align with your compliance rules. Here's how to turn your planning into an actionable framework.
Building a Role Taxonomy
A well-organized role taxonomy separates internal (buy-side) users from external (sell-side) users. This distinction is critical since their needs and risk levels differ significantly. By maintaining this separation, you can assign permissions more effectively, ensuring that each group only accesses what they genuinely need.
| Role Category | Side | Example Roles |
|---|---|---|
| Strategic Management | Buy Side | Category Manager, Product Categories Expert |
| Compliance & Risk | Buy Side | Certificate Manager, Questionnaire Manager |
| Evaluation | Buy Side | Appraiser, Approver, Qualification Expert |
| Administrative | Buy Side | Employee Administrator, Supplier Master Data Manager |
| Operational | Sell Side | Supplier Task Processor, Activity Manager |
| Technical | Both | Self-Registration User, RFC Connection Role |
Don't forget about technical roles - these are crucial for system-to-system connections and automated functions like self-registration. Aim to keep the total number of roles between 8 and 15. Having too many roles can make the system harder to manage and audit.
Once these role groups are established, the next step is to assign permissions to each role.
Assigning Permissions to Roles
With roles in place, it's time to define what each role can do. Using a tiered permission model makes this process clear and easier to maintain:
- View-only: Access to dashboards, reports, and master data lookups.
- Create: Ability to initiate transactions like purchase orders or invoice drafts.
- Edit (Limited): Permission to modify data, but only before approval or within a defined time window.
- Approve: Dual-control validation for specific thresholds.
- Cancel/Reverse: Restricted actions that require logged remarks.
- Export: Access to sensitive reports, limited to specific roles.
For instance, a Data Entry Operator might be allowed to add or edit supplier profiles but not review or approve them. On the other hand, a Compliance Manager could handle all three tasks. This clear delineation minimizes confusion and strengthens security, making audits simpler.
"The moment 'who changed this?' becomes answerable in 10 seconds, your ERP trust rises." - Gamavis Software Solutions
Applying Least Privilege and Separation of Duties
Once permissions are assigned, enforce strict access controls by applying the principles of least privilege and separation of duties. Start with the minimum access required for each role - no more, no less. Avoid granting full-control permissions unless absolutely necessary.
"Regardless of the permission and permission level, always default to the principle of least privilege. This involves making sure your end users have the absolute minimum level of system access needed to perform their daily duties." - Sonny Spencer, Director of Finance Operations, Salto
Separation of duties (SoD) adds another layer of security. For example, in a Procure-to-Pay process, the person responsible for creating vendor records and banking details should not be the same person who processes payments. If your team is small and SoD conflicts are unavoidable, use approval workflows as a safeguard. These workflows ensure that no user can approve a transaction they initiated.
Finally, review all roles assigned to each user. Sometimes, combining a secondary role with a primary one can unintentionally create SoD conflicts that neither role would cause on its own. Regular reviews can prevent these issues before they arise.
Implementing RBAC in Your Supplier Portal
Once you've established a detailed role taxonomy and mapped out permissions, it's time to put your RBAC system into action. This involves configuring roles in your admin console, syncing with ERP and AI tools, and rolling out the system gradually to ensure a smooth transition and thorough testing.
Configuring Roles and Permissions in the Admin Console
Start by leveraging predefined roles instead of creating everything from scratch. Most supplier portal platforms come with default roles like iSupplier Portal Full Access or Supplier Profile Manager. Use these as a foundation to build custom roles that inherit privileges. Stick to a clear naming convention and avoid altering default roles to maintain compatibility during system upgrades. Also, steer clear of reserved prefixes (e.g., "SC_") when naming custom roles.
To control data visibility, assign specific attributes to roles. For instance, the ICX_SUPPLIER_ORG_ID attribute can limit users to data from their supplier, while ICX_SUPPLIER_SITE_ID restricts access to particular locations. For API access, assign precise CRUD permissions, such as SC_Data_API:R for read-only access.
When onboarding new users, profile options can streamline the process. For example, setting POS: Default Responsibility for Newly Registered Supplier Users automates initial access assignments. Similarly, setting POS: External Responsibility Flag to "No" ensures that incomplete roles aren't assigned prematurely.
Integrating RBAC with ERP and AI Tools
To maintain consistency, align your portal's access controls with your ERP system. Map portal users directly to ERP master records, like AP Supplier tables, so permissions are synchronized across procurement and accounting processes. Internal roles, such as iSupplier Portal Internal View, should reflect the document security protocols already in place within your ERP's Purchasing module.
For AI-driven automation, static RBAC isn't enough. AI agents, which may perform thousands of API calls per minute, require permissions to be evaluated dynamically at runtime. Use dedicated service accounts with narrowly scoped, read-only API access (e.g., SC_namespace_API_RO). For example, platforms like Leverage AI can automate supplier follow-ups and purchase order workflows by integrating with your ERP. Be sure to grant permissions only for specific tasks, such as accessing purchase order data for follow-ups, and revoke or restrict access once the task is finished.
"RBAC for AI agents is not a peripheral security feature; it is the foundational enabler for scalable, trustworthy autonomy." - Alessandro Pignati, NeuralTrust
After integration, test the system thoroughly in stages to ensure everything works as intended.
Testing and Rolling Out RBAC in Stages
Before involving external suppliers, validate your RBAC configuration internally. Assign the iSupplier Portal Internal View role to a small group of internal users to confirm that data visibility, tab access, and workflows are functioning as expected.
Following successful internal testing, conduct a pilot program with a select group of external suppliers. Use features like Prospective Vendor Registration to test the onboarding workflow on a smaller scale before rolling it out fully. During this phase, limit access to complex features - such as e-signature workflows or ASN creation - by using function exclusions to simplify testing.
Gather feedback, refine role definitions, and expand access gradually. Start with low-risk functions, like viewing order statuses, before enabling more sensitive actions, such as submitting invoices or updating banking details. This phased approach minimizes risks and ensures a smoother transition.
Monitoring and Managing RBAC Over Time
Running Regular Access Reviews
Managing RBAC (Role-Based Access Control) isn’t a one-and-done task - it’s an ongoing effort. Over time, roles can drift as new suppliers join, employees change positions, or processes evolve. This often leads to "permission creep", where users retain access they no longer need. Studies indicate that organizations typically maintain 40–60% more roles than necessary, often because temporary roles unintentionally become permanent.
To keep things in check, establish a consistent review schedule. For example:
- Monthly checks: Revoke unused permissions and flag inactive supplier accounts.
- Quarterly audits: Ensure role definitions align with current job functions. These audits should also include formal sign-offs from department heads, confirming that each user’s access remains appropriate.
Integrating your RBAC system with an HR platform like Workday or SAP SuccessFactors can streamline this process. For instance, when an employee leaves or transfers, their roles can be automatically adjusted or deactivated within 24 hours, aligning with ISO 27001 standards. Regular reviews like these lay the groundwork for effective monitoring and quick role updates.
Tracking Access Patterns and Anomalies
Even the best RBAC setup can fall short without proper monitoring. Centralized logging is vital - it captures every key action, such as login attempts, document downloads, or changes to banking details. Logs should include detailed context: who performed the action, their role, the IP address used, and the specific changes made.
To go a step further, consider using AI-based anomaly detection. This can flag unusual activity in real time, like a supplier account logging in from an unexpected location at 3 a.m. or a read-only user attempting bulk data exports. According to Verizon's 2025 Data Breach Investigations Report, 63% of ERP-related data breaches stem from excessive or poorly managed permissions. For high-stakes actions - like updating supplier bank details or approving large purchase orders - implement a maker-checker workflow. This ensures one user initiates the action while another approves it, adding an extra layer of security.
Updating Roles as Operations Change
As your operations evolve, so should your role structure. Supply chains are dynamic - expanding to new distribution centers, working with new supplier categories, or implementing tools like Leverage AI for automation can make existing roles outdated.
Instead of creating new roles for every operational change, try adjusting the scope of existing ones. For example, limit a role’s access to a specific plant, branch, or supplier segment. This approach keeps your role count manageable and avoids unnecessary complexity. If the number of distinct roles starts to outpace active users or supplier tenants, it might be time to consolidate roles or explore a more flexible system like Attribute-Based Access Control (ABAC).
Role mining tools can help by analyzing actual usage patterns and identifying unnecessary permissions. These tools can significantly reduce an organization’s permission footprint - by as much as 50% within the first three months of deployment. Pair this with short permission cache TTLs (30–60 seconds) to ensure updates propagate across the system almost instantly, without requiring a full restart.
Conclusion
Introducing RBAC (Role-Based Access Control) to a supplier portal enhances both security and operational clarity. Start by mapping out your processes and defining roles in detail. From there, establish a clear taxonomy, adopt the principle of least privilege, and roll out the system in manageable phases. This structured approach creates a strong foundation for ongoing security as your business grows and changes.
But the work doesn’t end with deployment. To keep RBAC effective, it’s essential to conduct regular access reviews, maintain thorough audit logs, and adapt roles as your supply chain evolves. Many security breaches stem from poorly managed permissions, so treating RBAC as an ongoing process rather than a one-time task helps reduce these risks.
Using automation tools, like those offered by Leverage AI, can take your supplier portal to the next level. This platform integrates with your ERP system to handle automated purchase order management, monitor performance, and provide real-time visibility into your supply chain. When automation and access controls work together, you not only minimize security risks but also cut down on administrative burdens.
FAQs
What’s the fastest way to define RBAC roles without creating too many?
Begin by creating broad, reusable roles that align closely with your core business functions. These roles should cover general responsibilities without diving into unnecessary specifics. Once the basics are in place, you can add more specific permissions, but only when absolutely necessary.
To define roles effectively, use organizational charts and job descriptions as a guide. This helps establish clear boundaries and ensures that each role serves its purpose without overlapping too much with others. Avoid making roles overly detailed - consolidate similar functions where possible and make use of templates to streamline the process.
It’s also important to regularly audit your existing roles. This helps identify and remove redundancies, keeping your system clean and efficient. Additionally, require a solid business justification for creating any new roles. This approach not only enhances security but also ensures your system remains manageable over time.
How can I prevent permission creep in a supplier portal?
Stopping permission creep requires consistent oversight and adhering to strict access control principles. Here are some practical steps:
- Perform regular access audits: Periodically review who has access to what and remove permissions that are outdated or unnecessary.
- Implement role-based access controls (RBAC): Assign permissions based on roles, ensuring users only have the minimum access needed for their job.
- Automate permission adjustments: Streamline updates during onboarding, role changes, and offboarding to prevent lingering or excessive access.
By following these steps, you can maintain tighter control over access, reduce security risks, and support long-term compliance.
What extra controls are needed when AI or service accounts use portal APIs?
Extra controls for AI or service accounts using portal APIs include features like detailed role-based permissions, IP allowlisting tailored to specific roles, and the ability to manage API tokens with defined expiration dates and revocation options. These tools are designed to uphold the principle of least privilege and ensure access remains secure.